Tuesday, March 31, 2009

My Budgie Weighs One Ounce

Nikolai has been with me for one month now, which would make him just about 3 1/2 months old. He/she is really the sweetest budgie I've ever had. He's learned a lot over the past few weeks. He is able to give kisses, step up, step down, grab a ball and drop it into my palm and touch a target object on command. I have training sessions with him at least twice a day. We work on the things he knows already and try to learn new tricks.

His very beautiful coloring is yellow face type 2 cobalt opaline cinnamon.

He just got a new play gym a few days ago that he absolutely loves. He usually gets at least 45 minutes or so out of the cage to play on the gym by himself each day. He's very tame and will entertain himself on the gym while I read do something else nearby. Out of curiosity I used his play gym today to weight him. I put a scale on top of the cage, put the gym on the scale, then put Nik on the gym. Sneaky huh? Well, adorably enough the little fellow officially weighs only one ounce.

Just for reference, that weight is equivalent to an empty ring box and a spool of thread.


"Hey, I found another budgie in this shiny part of my gym! "

Nik's color mutation is very beautiful.
Note the little patch of blue on his belly.


A short video of our training sessions.
That's millet all over the table. Spoiled bird.

Monday, March 30, 2009

A Gentle Push Towards Illumination

In getting back to all things medieval in my life, I've increasingly found myself thinking "I should try my hand at illumination." In the past I've taught classes on herbal preparations and reproduction jewelry making, but I realized that I want to engage in something that really takes unique personal talent. Herbalism surely requires knowledge and research. Jewelry making does take some planning, patience and supplies. Then there's illumination. That take research, skills, planning, supplies, practice and some natural talent that's hard to duplicate. Since I've been drawing for most of my life and painting on and off since I was 10, I'm surprised I didn't pursue illumination earlier. I've taken a short class, read quite a bit on the topic, accumulated a few supplies but for whatever reason I've hesitated to really delve in fully.

So the universe decided to give me a big push this week. A good smack across the head really.

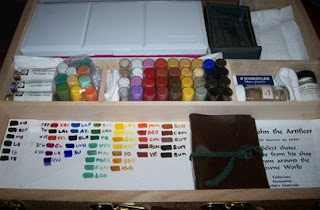
First I found the perfect box to keep all of my illumination supplies in. A lovely wooden sketch box with brass latches and a leather handle. The box had plenty little compartments inside and even a place to store a bristol paper pad. It was also 50% off. Sweet.

Then I unearthed all of the little brushes I knew I had but couldn't find.

Then I found an amazing on-line source for images of period illuminations. Some nice detail images of diapering and faces that excited me.

Finally, someone in my shire send out a message that she was parting with a bunch of illumination and calligraphy books (for FREE) ... and some illumination supplies (for very cheap).

I'm proud to say that I now own 50 vials of period pigments, some gum arabic powder, a brush dish, some pergamenta paper and 5 very great books all for an extremely reasonable sum.

Yes, universe, I can take a hint.


Above: Inside the illumination box. Everything fits so perfectly, it's destined.

Below: All of the new books.


Sunday, March 22, 2009

Knowledge and Resources from Nova Schola

Yesterday I had the pleasure of attending Nova Schola hosted by the Shire of Hartshorn-dale in the East Kingdom. The day was full of interesting classes, many knowledgeable folks and a delicious dayboard. I didn't bring my camera to the event, so alas no pictures. I will share a little about the classes I attended and some interesting information and resources I aquired throughout the day.

-----------------------------------------------
Arrow Making- taught by Naomi bat Avraham
-----------------------------------------------
I wanted to attend this class to have the chance to try some techniques in person and was very pleased with how well stocked and prepared the teacher was to show just that.

Some things I learned:
- Ash, while a strong wood for shafting, does not want to stay straight.
- You can use higher spine weights than your bow, but never lower ones.
- Giant feather fletching is used to create Floo Floo arrows for bird hunting.
- Right wing arrows are from the right wing of a bird and have their catch to the left.
- You can attach points with a glue gun. Fancy that.
- Fletching jigs are less complex to use than they look.

Some resources from class:
Naomi's Website w/ Arrow Making Tutorial
High Quality Cedar Shafts

----------------------------------------
Simple Period Tunics taught by Bertana
----------------------------------------
I actually walked into this class thinking it was period handsewing, but realized that I mixed up the times and decided to stay since I knew the teacher and might learn a few things. A good selection of handouts were available in this class.

Some things I learned:
- Underarm gussets can be cut directly from the sleeve.
- Handstiching is the easiest way to sew a neckline. (I've always struggled with this on a machine.)
- Your basic tunic made from a geometric pattern is seen across many cultures and many centuries, making it a very versatile starter piece.
- Couching embroidery and simple chainstitch outlines can be used for embellishment.

Resources from class:
Pictures of extant tunics (includes Bocksten and Skjoldehamm)

----------------------------------------------------------
Authenticity 101 taught by Mistress Brangwayna Morgan
----------------------------------------------------------
I was hoping this class would maybe cover some methods for researching accurate sources for projects and give some tips on common pitfalls. Mostly we covered that those who are interested in authenticity are not "Period Nazis" or "The Authenticity Police" and that authenticity can be fun. I did pick up on some interesting bits of information in this class.

Some things I learned:
- Most people who provide unsolicitied criticism of attempts at garb are not experts in the area.
- Wool socks will keep your feet dry at war.
- Your recreations are only as accurate as your source.
- Vikings had access to silk in the 700s and 800s, but not again for several centuries.
- The easiest was to move towards seeming more authentic is to relate your modern experiences to period terms at events. Such as "I recieved a message." rather than "I got an e-mail."

-----------------------------------------------
Intro to Scribing - taught by Violante de Rojas
-----------------------------------------------
I was hoping that we would get the chance to talk about some period pigments and tools in this class, but as it was an intro we didn't delve as much into that. This class was an excellent overview of supplies and resources.

Some things I learned:
- You can use Sheaffer's calligraphy pens for scrolls.
- You can get refill cartriges for said pens to fill with waterproof ink.
- You can use Gouache for painting illuminations. Fancy that!
- Bristol paper is NOT good for scrolls.
- Hot press watercolor paper and Pergamenta are excellent paper choices.
- Use an X-Acto with a rounded blade for scraping, never a pointed blade.
- Don't let cats near scrolls!
- Don't use brushes intended for oil painting for illumination.
- Loew-Cornell's watercolor brushes are a better option. Personally, I've always be fond of their American Painter brushes.
- Use a white eraser and a large paintbrush to brush away eraser bits.
- NEVER blow away eraser bits from scrolls.
- Higgins Eternal is an excellent scroll ink for calligraphy.
- Borders on a scroll should be 1" to 1.5".
- The Ames Lettering Guide along with a cork backed C-Thru Metal Ruler are your friends.
- Quill dip pens WILL splatter.
- Manuscript pens are not very good, neither are Speedball.
- As a beginning scribe you will likely be paired with a mentor.

Resources from class:
A History of Illuminated Manuscripts by Christopher De Hamel
Medieval Calligraphy by Marc Drogin


----
Aside from classes yesterday I finally had the chance to submit my device for a conflict check and worked on documenting my SCAdian name. It's a big step that's been put on the back burner far too long. I am excited about the process and have been recieving a lot of help from the incoming Eastern Crown Herald, Lillia de Vaux. I'm sure I will add a post as that all progresses.

Tuesday, March 17, 2009

Why Celebrate Cultural Genocide?

It's been a few days since I've posted anything, but I feel the desire to express something today. I really struggle with the idea of St. Patrick's Day, especially as an unquestioned national celebration. St. Patrick is notably remembered as the figure who drove the "snakes" a.k.a druidic pagans out of Ireland. I say genocide in the title because while Patrick* may have done some good work in his lifetime, he also inspired an age of Celtic conversion to christianity by choice and by force. Let's be honest, few cultures adopt a different system of belief en masse without a fight. What bothers me is not just the harm and deaths that came to Pagans in this age, but the cultural genocide. By that I mean the destruction of age old beliefs, deep family ties to druid traditions, records of druidic history, sacred spaces and ancient druid relics.

I encourage you to read more about the happenings of St. Patrick's age in the translation of Oisin and Patrick. Oisin is a Celtic warrior and poet who's tales of pagan resistance to christianity have been passed down through oral tradition and documented by christian monks and druid scribes alike.

*- A note about "Patrick". There's no congruent historical evidence that Patrick as a person actually existed since even the oral stories were developed 300 to 900 years after when he was supposed to have lived. In this posting I really consider "Patrick" as a concept or mindset of the christian missionaries of the time. Keep in mind that the 5th century is a time of much migration and thus the introduction of different cultures, religious beliefs and the conflicts that arise.

Wednesday, March 11, 2009

Whole Wheat Chocolate Chip Cookies

I just baked a batch of these yesterday for practice and not a single one is left to take a picture of! I developed this recipe to include a lot of organic alternatives. These cookies come out big, soft and never too sweet. They have always been a hit.

--------------------------------------------
Whole Wheat Chocolate Chip Cookies
--------------------------------------------

Tools:
Large mixing bowl
Wire whisk
Sifter
Ungreased cookie sheets
Wooden spoon or baking spatula
Cookie scoop or teaspoon
Cooling rack

Ingredients:
1 cup butter or margarine, melted in the microwave
3/4 cup organic sugar
2 cage free eggs
2 teaspoons pure vanilla extract
2 1/4 cups organic whole wheat flour
1 teaspoon baking soda
2 cups organic semi sweet chocolate chips
2 tablespoons unsweetened applesauce

Mixing Directions:
1. Preheat the oven to 375 degrees F
2. Melt butter in the microwave (about 40 seconds on high)
3. In a large bowl whisk together butter and sugar until creamy
4. Beat two eggs until fluffy, then whisk well into the butter& sugar mix
5. Add pure vanilla extract to the mix and whisk again
6. Sift in the flour one cup at a time, mixing well throughout w/ spatula
7. Sift in the last bit of flour and baking soda, mix until smooth
8. Mix in chocolate chips (you can substitute any kind of chip)
9. Mix applesauce into the dough, mix until evenly distributed
10. Place cookie dough by the heaping teaspoon onto ungreased baking sheets, leaving about 2 inches between each cookie for expansion

Baking Directions:
1. Bake for 8 to 9 minutes in the preheated oven. They may seem a bit soft, but will firm up as they cool.
2. Allow cookies to cool on baking sheet for 5 minutes before removing to a wire rack to cool completely.
3. Share and Enjoy!

Monday, March 9, 2009

Archery - Making a Leather Quiver

This past Saturday I had a day long Functional Sign Language training in Lancaster which was conveniently only a few minutes away from Lancaster Archery Supply. I dropped into their facility to have a look at bows and get some quiver options. I knew going in that I wanted a hip quiver that was basic and functional for target shooting. I really struggled with the knowledge that I could make one myself if I just drafted a pattern and had some tubes. I ended up buying a simple quiver with three arrow tubes to dissect and recreate out of leather. I mainly did this because they didn't have separate arrow tubes in stock and I figured the few extra dollars spared me having to draft out a decent pattern from scratch. I will go over my process below.

--------------------
LEATHER QUIVER
--------------------
My leather target quiver is based on a simple modern target quiver. It is basically a sleeve pattern piece of leather that tucks into a rectangular tab at the base of the sleeve. It uses three arrow tubes to hold twelve arrows. It is designed to be a hip quiver and has a strap that can be attached to a belt of a pair of pants using a clip.

I used a 3oz brown leather for the outside of the quiver and used the original canvas piece as a lining. A 4-5oz leather alone is probably a better idea. I also used oval shaped scraps of black leather as reinforcement areas for the strap that secures the arrow tubes. The straps are from the original piece, but could easily be made with leather straps and riveted below the O ring for the belt clip.

I sewed the entire piece on my Janome, but I have to admit some of the areas were difficult even for my heavy duty machine. I would suggest taking your time and having a pretty hardcore needle in your machine.

Here are some pictures of the finished quiver:


Archery - Making a Leather Shooting Glove

As I wrote in a previous post, I'm finally getting into archery and have little in the way of supplies. I've been working over the past week to change that though. Along the way I ran into a problem that I often have. I found myself looking at supplies and immediately going "I could make that. In fact I have the materials at home already. I should just inspect it and figure out a pattern for it on my own." I of course have to recognize that my creative talents are better left to sewing and leather work as opposed to woodwork. So I decided to concentrate my efforts thus far on a leather shooting glove and a leather target quiver. First I will discuss the glove.

-----------------------------------------------------
THREE FINGERED LEATHER SHOOTING GLOVE
-----------------------------------------------------
I made it over the course of two days. All in all it probably took closer to three or four hours of work including patterning and sewing, but there was much delay in between. (A certain budgie wanted to be on my hand when I was trying to hand stitch.)

I created the pattern based on a leather winter glove I own and a pattern I found on Glove.org. That glove site is profoundly helpful and was created by an SCAdian lady. I may include the pattern image if I ever decide to scan it. Most of the sewing was done on my new machine, but the tips of the fingers, the center points between each finger and securing the horn button were done by hand.

I used a lovely 3oz brown leather I purchased a few months ago for the glove and a strip of 5-6oz black leather that I got a few Pennsics ago for the wrist strap. The horn button was purchased at Jo-Ann's. I am happy with how it turned out for the most part. I had some difficulty getting the points to meet with the tips of the fingers, but this was expected for a first time glove project.

Some pictures of the completed glove are below:

Palm view of the entire glove.

Horn button and wrist strap.Back view of fingers.

Palm view of fingers. The middle one aligned poorly toward the tip. Grr.

Saturday, March 7, 2009

Save the Dulcimer

I am not quite finished the next project I want to share here, but I came across something today that was just bloody fabulous. I will share that instead. There is a talented dulcimer player in the UK by the name of Dizzi. I will let the following videos of her music speak for themselves. Hopefully you'll understand my loss for words concerning her.

First, a Medieval-esque approach...
(I'd love to see her in some period garb btw)


Second, the rocking fab modern adaptation...

Thursday, March 5, 2009

Medieval Limp Book Binding Part II: Process and Closure

I finally went out and purchased a tripod for my camera so I can make some tutorial videos! I'm excited to finally share my limp binding process steps. The videos below cover my process and a technique for book closure. I have also added links to two videos that I found very helpful when I was just starting. Enjoy!

Medieval Limp Binding Process 1/2


Medieval Limp Binding Process 2/2


Medieval Limp Binding Closure


If you are interested in book binding, you may also want to watch:
Ricefz's Simple Book Binding Part 1
Ricefz's Simple Book Binding Part 2

Wednesday, March 4, 2009

Archery Practice


I finally, after years of excuses, made it to an SCA archery practice. Being poorly under equipped, I was glad they had some loaner gear on hand. I can't say I'm good at shooting but I didn't hit any people, didn't damage anyone's arrows, stayed withing two feet of the target area and only got scratched up a few times. That all spells first day success to me. Tonight was probably the most fun I've had in a while. That mostly being attributed to the combination of finally doing something I've put off for far too long and having the chance to do it with a friendly group of people. The evening was nicely wrapped up with a group trip to a local diner and my almost one hour ride home (which flew by). Once I got settled at home, I got online and ordered a dozen wooden target arrows. I'm definitely pretty excited about all this. I will absolutely be there next week and I'm hoping that I'll have the chance to get a few things in the mean time. A flemish string, bow stringer, bracer, hip quiver and glove are on that list. I don't want to rush out and get the first things I see. I would like to at least be patient and get some quality supplies if I'm going to stick with this. I have a sign language training this weekend in Lancaster, so I may stop by the archery shop out there and see what I can do about making myself a properly stocked archer. Horray for discovery!

This image above is "Discoverer" by Gold-Seven

Sunday, March 1, 2009

Birdie Muffins

Today I am sharing a recipe that I've created based on a bird bread mix. These mini muffins include tons of nutrition for your little bird. I hope your feathered friends enjoy them!


Birdie Muffins

-------------------------------------

INGREDIENTS

-------------------------------------

1/2 cup organic whole wheat flour

1/2 cup wheat germ


1/4 tsp baking soda 


1 washed free range egg with shell

1 1/2 Tbs organic virgin olive oil 


1/2 cup organic apple apricot sauce

A few slices of carrot

A few leaves of organic baby spinach

A few small florets of broccoli

1/2 cup seed mix


Suggested seed mix: Wheat berries, millet and your bird’s regular seed

Veggies: You can use other veggies, but be certain that they are safe for your bird


-------------------------------------

COOKING INSTRUCTIONS

-------------------------------------

Preheat the oven to 350 degrees

Grease a mini muffin pan

Mix flour, wheat germ and baking soda together

Wash the egg

Beat the egg, egg shell, oil and applesauce in a blender

Add the veggies to the blender and mix until finely chopped

Add the wet mix to the dry ingredients, stirring until smooth

Stir in the seed mix

Fill the mini muffin sections 1/2 full

Bake for 11 minutes at 350 degrees.

Cool on a rack

Refrigerate a few muffins and freeze the rest for later


-------------------------------------

NOTES

-------------------------------------

These muffins may be a little big for keets or lovies, so make sure you break them into little pieces when you feed them to your bird.